Our colour and writing products are manufactured in our workshops in Geneva since 1915.
Julie Adore
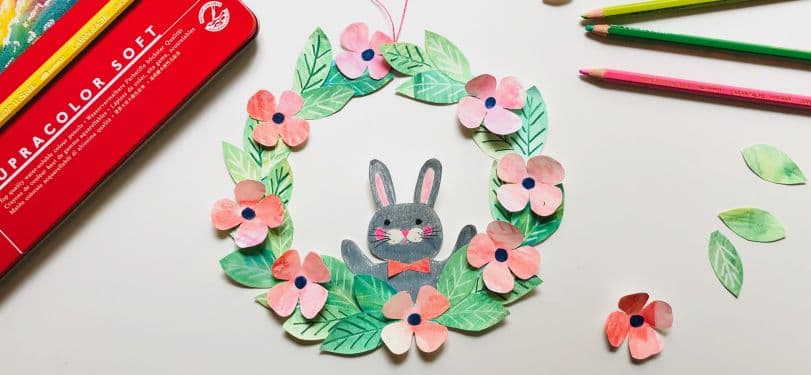
Easter Decor: create a charming hanging wreath in the style of Julie Adore
Before embarking on the annual Easter egg hunt, mark the arrival of Easter by creating a hanging wreath adorned with bunnies and flowers. A simple and playful decoration to make with your children in this fun arts and crafts activity.
A warm and friendly celebration, Easter is the perfect time to organise a creative family activity and decorate your home with a DIY piece designed by Julie Adore.
Easy to make, whether on your own or with helping hands, this floral decoration will bring a touch of Spring to children’s bedrooms at Easter.
Select your favourite coloured pencils and let your imagination run free with this craft activity that will delight the whole family!
HOMEMADE EASTER DECOR: 3 EXCELLENT REASONS TO CREATE PERSONALISED DECORATIONS
1. Enjoy a creative family activity
Keep children happily occupied during the Easter holidays with a creative and hands-on activity to enjoy as a family. Young and old alike can take part, designing a decoration for the home or their bedroom. Drawing, painting, colouring, cutting, customising and gluing are all creative craft activities that children love.
2. Design an original and long-lasting decoration
Beyond the playful and creative aspect, this is an opportunity to create a unique Easter decoration that you will enjoy displaying in your home year after year. Unlike a shop-bought decorative item, a DIY homemade item holds sentimental value. At Easter, crafting together becomes a creative interlude, a time for making lasting memories and special family moments.
3. Play with Spring colours and Easter symbols
Hanging wreaths, bunny garlands, painted eggs, paper flowers: at Easter, there are endless craft ideas to explore as a family, inspired by the colours and features of nature. By designing your own Easter decoration, you are free to draw , create and personalise your favourite symbols. Let your imagination guide you.
“Easter is for me the feast of the family, of children and of traditions. It is also a beautiful reason to mark the arrival of Spring, to celebrate the rebirth of life and the awakening of nature.”
Julie Adore
DESIGNING YOUR EASTER HANGING WREATH: WHERE TO BEGIN?
Choose your range of colours
Before you begin creating your Easter wreath, select the shades you will use for your bunny, leaves and flowers. Opt for tones that reflect the colours of spring and the symbols you wish to paint or draw.
Julie Adore’s selection:
“For this piece, I chose a variety of greens for the leaves: fir tree green, meadow green, olive green... clear and white for the veins. Cheerful and fresh greens that immediately remind us of the young plants. I chose pink for the flowers, scarlet for the petals and a Prussian blue to create a contrasting centre. For the rabbit, I used grey, black and pink.”
Find Easter design ideas you love
Rabbits, hens, eggs, tree branches: many patterns and symbols capture the spirit of Easter. As a family, choose the designs you would like to add to your DIY wreath. Select easy-to-draw patterns that your children can reproduce.
Select the right supplies
Choosing the right supplies is essential for a successful homemade decoration. Here is what you will need to create a hanging Easter wreath:
• A box of Supracolor™ Aquarelle water-soluble coloured pencils
• A water brush
• Cardstock
• Drawing paper (90 gsm)
• A pair of scissors
• Glue
• A piece of string
• A bowl to draw the template (approximately 15 cm in diameter is sufficient for this activity)
• A water brush
• Cardstock
• Drawing paper (90 gsm)
• A pair of scissors
• Glue
• A piece of string
• A bowl to draw the template (approximately 15 cm in diameter is sufficient for this activity)
STEP-BY-STEP TUTORIAL: CREATE YOUR EASTER HANGING WREATH IN THE STYLE OF JULIE ADORE
Step 1: Create the base of the wreath
To create the the base of the wreath, forst take some cardstock.
• Place a bowl on top and draw a circle.
• Inside the circle, draw another circle by hand with a pencil about 1.5 cm from the outside edge.
• It does not really matter if it is not perfectly round.
• Make a hole in the middle with scissors and cut out the inner circle. Then cut out the line made by the bowl. Now your base is ready.
Step 2: Colour in the leaves and flowers
This is a fun step that can be done by children.
• Colour your drawing paper using your green pencils. Make strokes in all directions to create a textured effect for the leaves. Then lightly brush over the coloured paper with a damp brush so that the pigments blend together.
• Next, use pink and scarlet to create the shapes of the flowers.
Step 3: Draw the rabbit
If you are unsure how to draw a rabbit, start with simple shapes or sketch fine lines that can be erased later.
• Begin with the bunny’s ears, then draw its raised paws (as though it were waving hello).
• Colour the body in grey, the tip of the nose in pink, and add black eyes and whiskers before cutting it out.
Step 4: Cut out the leaves
For a wreath with a 16 cm diameter (like mine), you will need at least 30 leaves and about 10 flowers.
• In the green paper you have made, cut out strips about 3 cm wide, fold them in zigzag about 4 cm high.
• Draw a simple shape of a leaf: two curved lines that join each other at the ends. Cut it out!
• In the green paper you have made, cut out strips about 3 cm wide, fold them in zigzag about 4 cm high.
• Draw a simple shape of a leaf: two curved lines that join each other at the ends. Cut it out!
Step 5 : Cut out the flowers
• In the pink paper you have prepared for the flowers, cut out 5 cm wide strips and fold them in zigzag to make squares.
• Draw a large circle, then a small circle to mark the centre and then the 4 petals. Cut them out carefully.
• Draw with Prussian blue the round centre of the flower.
Step 6 : Assemble your wreath
For this step, slip into the shoes of a florist to compose your wreath.
• Start by placing your rabbit at the bottom of the wreath.
• Glue it on the back of your wreath.
• Now glue the leaves on the front side of the wreath, starting bottom left and alternating between the leaves and the flowers. Repeat the process from the bottom right.
• Attach the piece of string.
💡 Tip: apply glue to only one end of the leaves. For the flowers, you can put glue only in the centre and then fold the petals upwards to add more volume to your composition.
Your beautiful wreath is now complete, all that remains is to hang it! An original creation that will bring a touch of spring to your children’s room all the way to the Easter celebrations.
🐣 Looking for other decorative ideas?
Why not create your own Easter eggs by following our online DIY guide?
Why not create your own Easter eggs by following our online DIY guide?
Free from CHF 80 purchase.
Possible return under 14 days.
Possible return under 14 days.


Monday to Friday from 10am to 7pm and Saturday from 10am to 5pm.
+41 (0) 848 558 558
(Calls from Switzerland : at local rate. Calls from abroad : at telecom provider’s international rate.)
+41 (0) 848 558 558
(Calls from Switzerland : at local rate. Calls from abroad : at telecom provider’s international rate.)
![]()
Create an account to benefit from all the exclusive advantages of our loyalty program.
Choose your online shop based on which country your order will be sent to
 Austria
 Belgium
 France
 Deutschland
 Japan
Japan
 Netherlands
 Switzerland
 United Kingdom
 United States

Let’s stay in touch
Subscribe to our newsletter and benefit from a 10% discount on your next order.